Synology WRX560 Review

Let’s reflect on what life has been like with the Synology WRX560 router after a year of use and recall why we chose it and whether it fulfills the promises made by this traditional network storage manufacturer.

Based on our experience with Synology products, we can say that compared to competing products, Synology’s hardware solutions are not exceptional, but offer a ton of power.

Hardware:
Dual WAN (1GbE WAN Primary + 2.5GbE WAN Secondary/LAN), 3x 1GbE LAN
Wi-Fi 6: IEEE 802.11ax (802.11a/b/g/n/ac/ax, 2.4GHz: 600Mbps, 5GHz: 2400Mbps)
Security: Up to WPA3-Personal/Enterprise, Wi-Fi Enhanced Open (OWE)
USB: 3.2 Gen 1 x 1 (5V, 0.9A power output)
CPU: QUALCOMM Hawkeye IPQ8071A Quad core 1.4 GHz (average load 2.71%)
RAM: 512 MB DDR4 (typically used 60%)
Average power consumption 10.80 W (in operation)

Advantages:
+ Modern design without external antennas (comparable range to external ones)
+ Mesh network that eliminates uncovered spots when using multiple Synology routers
+ If considering Mesh, it is not necessary to buy the same model. For example, the MR2200AC model, at approximately half the price of the WRX560 model, is sufficient for extending coverage to less critical areas (maximum 1 primary + 12 WiFi nodes connected by cable, or 1 primary + 6 WiFi nodes)
+ Smart WAN switches or balances the load between two internet service providers

Synology knows well that the competition is strong in terms of hardware. What we appreciate about Synology is hidden in the power of their software, specifically in the SRM operating system.

SRM is a chapter unto itself and, like DSM for NAS, deserves a separate blog. However, we’ll try to highlight what we’ve enjoyed about SRM over the past year and continue to enjoy:

Software:
+ SRM intuitive interface using a desktop-like environment similar to DSM in the NAS
+ Simplified mobile app for SRM system management
+ Option to log in with two-step verification in the Secure SignIn app
+ Remote and SSL-secured management from anywhere thanks to the Synology.me domain or QuickConnect ID
+ Interaction between DSM and SRM systems for necessary router settings can be done automatically from the DSM system in NAS
+ Configuration of guest networks and other virtual networks (network segmentation, max 5, trunk) and their schedule. Example, the guest network is only active between 8am – 6 pm
+ The ThreatPrevention app helps directly protect network traffic
+ Regular SRM updates throughout the past year
+ The VPN Plus Server app is used for remote access to our network
+ The Safe Access app is used to assign devices in the network to individual users/profiles, e.g., a profile for smart assistants in the home
+ Monitoring specific activities of devices/users on the internet, including visited pages and the duration of these activities (we see this as a privacy intrusion and do not use this feature). However, it is suitable for parents who want to monitor their children, and it is possible to restrict unsuitable content or limit their internet time to selected time windows
+ When connecting an external SSD/HDD via USB, the File Station app can be used to launch file services on the network dedicated to selected users based on their permissions. Here we see that SRM has taken the best from DSM. It can even be connected to a domain/LDAP
+ The Security Advisor app, which we regularly use, comprehensively analyzes the SRM system and recommends steps to secure it. Very useful application.
+ Notifications via email, SMS, or mobile app are very practical
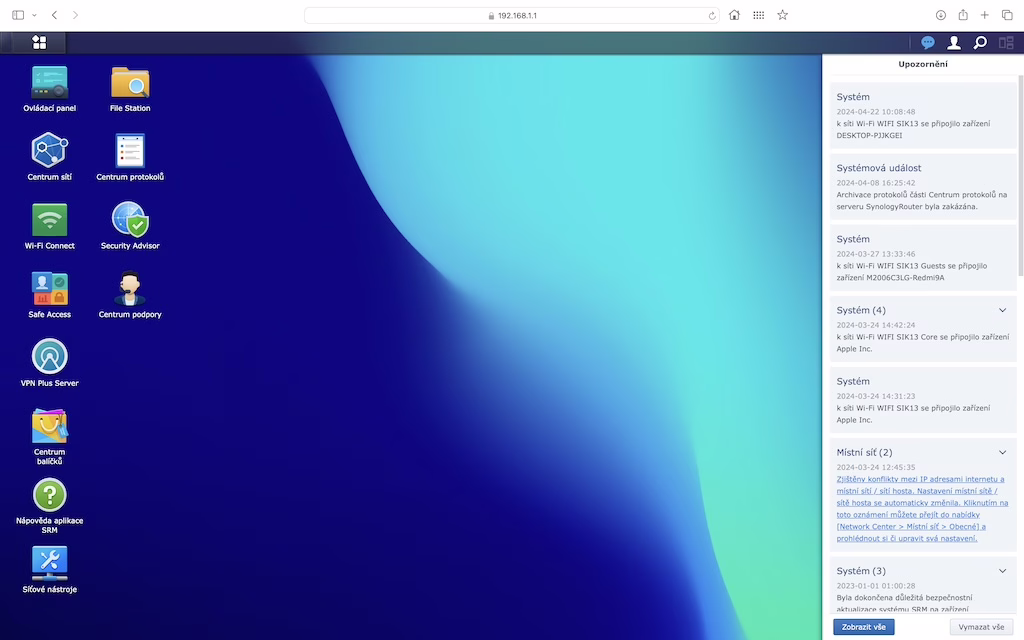
+ The Network Center app provides a great overview of network status and individual port speeds, internet settings, port forwarding, local network including VLAN, control and operation modes, and security
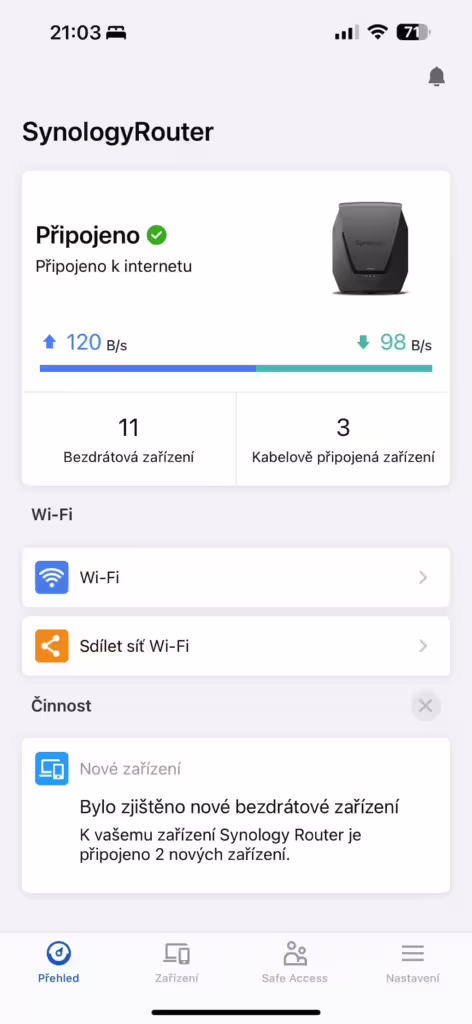
+ The Wi-Fi Connect app allows viewing the current status of Wi-Fi networks, settings, points, and clients and their current Wi-Fi network usage
+ Up to 10 Wi-Fi SSID
+ Other apps: Download Station, DNS Server, Media Server, and RADIUS Server

Screenshots:

Desktop environment of the SRM
Look at Mobile app DS Router on iOS

During the year-long test, we did not encounter any problems, and the device works flawlessly. Negatives are hard to find in our usage case. Perhaps another 2.5GbE port and the ability to switch to the SRM desktop environment directly from the mobile app, as in the DSM operating system for NAS, for more detailed system settings directly from the mobile phone would be appreciated.

In conclusion, it is highly recommended for home users or small businesses. For more professional or complex deployments, solutions from companies like Ubiquiti might be considered.

More information about Synology routers can be found on the manufacturer’s website.

DJI Osmo Mobile 6 Review

Let’s take a look at a gimbal designed for stabilizing mobile phones from DJI today.

Although camera stabilization in mobile phones is at a very decent level, many creators will appreciate the idea of taking it a step further to make the final videos look more natural and attractive without unnecessary shakes, sudden movements, and possibly with a horizontally anchored image.

The DJI Osmo Mobile 6 has numerous advantages and easily meets the expectations of a casual user. After long-term testing, we can reveal several undeniable advantages as well as some drawbacks.

Advantages
+ Seamless pairing with iOS or Android (tested with Apple iPhone 14 Pro Max) via Bluetooth 5.1
+ Mobile phones can be quickly secured in the extendable jaws
+ The jaws themselves, which firmly grip the mobile phone, have a rubber layer
+ Incredibly fast, precise, and firm attachment of the jaws to the arm using a magnet
+ Overall robust construction from quality material, feels sturdy (309 g)
+ Compatible phone weight of 170 – 290 g, thickness of 6.9-10 mm
+ A hole in the body for threading a lanyard, suitable as a safeguard against dropping
+ Telescopic arm
+ Grip tripod can be easily screwed on
+ Bag included in the package along with a USB-C charging cable
+ Long battery life (up to 6.4 hours)
+ Silent, precise movements without secondary vibrations, very quick response to shocks
+ 3-axis stabilization
+ Very intuitive controls
+ Works immediately after mounting the phone, without third-party apps
+ Resemblance to an airplane joystick is purely coincidental, ergonomic folding design
+ Sound status notifications
+ Button for rotating the phone from vertical to horizontal orientation
+ Sensitive and precise joystick for phone rotation (adjustable speed)
+ Recording button within easy reach
+ Selection of 4 modes on the M button (Follow, Tilt Lock, FPV, Spin Shot)
+ Side wheel (adjusts focal length or zoom when turned)
+ When using the DJI MIMO mobile app for shooting, advanced features such as Active Track, Timelapse, Dynamic Zoom, Gesture Control, Panorama, and full functionality of all buttons are available, which you don’t get with the default iOS camera app
+ Ideal for video bloggers for social networks (ideal for vertical use)
+ Stabilizes very well even when running downhill
+ Possibility to purchase various adapters for action cameras, attaching a flash, light, or microphone

Drawbacks
– DJI MIMO app is cluttered with ads, unstable, 4K 30FPS, records in MP4 (sometimes problematic with iOS)
– Inability to rotate indefinitely around its axis (due to design)
– Lack of broader language support (including Czech)
– Possible differences in camera performance when shooting on iOS and Android with the DJI MIMO app
– Limited range of motion for horizontal phone rotation
– Not water-resistant

In its price category, it offers more than one would expect and is highly recommended by us. We are very pleased with it in practice world and would not hesitate to buy it again after a year of use. However, we use it with the default phone camera iOS app set to 4K 60 FPS HDR and are extremely satisfied.

DJI Mic 2 Review

We are playing with the DJI Mic 2 right now. And why? Because we would like to try this toy.

If you’re a professional content creator or just a hobbyist and all of your video efforts have failed due to poor quality audio in the background of an otherwise perfect video, it’s time to rethink how you actually capture the audio track in your video.

Whether you’re shooting on your mobile phone, an action camera, or maybe even digital mirror camera, you’ll inevitably at some point consider whether your current setup is at least adequate for you.

And maybe, like us, you’ll be looking for something very versatile, because what if the new Apple iPhone just comes out, or you just want to replace your phone with a professional digital camera or shoot with an action camera. Because your creative thoughts are moving at a furious pace and you just want your gear to keep up with your pace and be just as versatile.

If you go to your local dealer for the DJi Mic 2, you will have many options to choose from, starting with a rather attractive offer of just one DJI Mic Transmitter and ending with a complete set including the receiver and charging case.

Let’s say that only the DJi Mic 2 Transmitter could be enough for you

If possible, ban such an idea straight away if you don’t accept the fact that you only use Bluetooth/analog to pair it with a phone or other device in a very limited way. Many inexperienced users will be misled by the attractive price tag and sobering up will follow. At the same time, we have to defend here that this is a real basis that “works” and that will be enough for some creators. But creators with a mobile phone in hand will often look for such a solution. Let’s briefly summarize in points what you get for less than 2500 CZK/99 USD.

Pros:
+ A separate wireless recording device capable of operating independently, as a recorder
+ Internal memory – 8GB (up to 14 hours of recording at 24 bit 48 kHz), which behaves like a flash drive
+ Able to record via Bluetooth and also backup to internal memory
+ Endurance up to 6 hours per charge
+ Suppression of ambient noise after a short press of the power button
+ Magnetic attachment to clothing or with an integrated clip
+ Wind protection included, with data/power cable and case
+ Connection via 2.5 Ghz with a range of up to 250m to the DJI MIC 2 Receiver
+ Bluetooth connection to DJi OSMO Pocket 3 or Osmo Action 4
+ Connection to a mobile phone or laptop also via Bluetooth
+ Possibility to connect an external microphone via TRS 3.5 mm (Lavalier microphone)
+ Vibration and status LEDs

Cons / Important Notes:
– One DJI Mic 2 Transceiver = Mono Transmitter/Recording Point (1 channel out of two possible)
– It can also record 32 bit float, but cannot be turned on without a DJI Mic 2 receiver
– Zero setting when connected via Bluetooth to a mobile phone
– For example, the Apple iPhone is not even able to recognize what kind of device it is
– Unable to record with default iOS camera app with this external microphone connected via Bluetooth. So you are dependent on external applications, such as DJi Mimo or ProCam.
– Very quiet input (necessity of post-processing, inability to set Gain)

If one mono microphone is enough for you, but the above comments could confuse you, buying a set of one DJi MIC Transmitter together with a Receiver would easily erase the above mentioned negatives and you suddenly get something that is born to work. And even such a connection to a mobile phone is immediately simplier (USB C/Lightning) and in the default configuration when connected via DJI 2.5 Ghz with a range of up to 250 m, this is a full-fledged toy that will surely make you happy for some 5700 CZK / 245 USD . And as far as the Apple iPhone is concerned, in this configuration it is already possible to record videos using the DJi MIC 2 even in the native Camera application. But there is still a very quiet input, which can be fine-tuned by setting Gain +6 on the receiver.

DJi MIC 2 (2x Transmitter, 1x Receiver, charging case)

But what if I want to record in stereo? DJi thought of that as well, and you can buy another Transmitter for the above set. However, here we reach the price level where the complete set including the charging case costs approximately 9000 CZK / 387 USD and the price difference compared to the solution without the case is already negligible. Similar to Apple AirPods, the case also stands as an additional battery/charger and thus extends the recording time up to 18 hours. A big advantage is that you don’t have to charge individual devices separately, but you can easily charge them all at once. What’s more, after opening the set, the microphones are immediately paired with the receiver, and the remaining recording time can be immediately read from the clear OLED touch screen.
Just take it out, place it and start recording.